I listen to a lot of folks talk about their Kubernetes strategy as a means of apportioning a finite, limited resource (compute) among a wide and varied set of people, usually application developers and operations nerds, with an eye toward isolation.
I have bad news for you.
Docker learning - Docker's Overlay network Docker installation and simple use of the Windows system Docker Docker environment builds and uses Docker Visual Management Tools Dockerui Docker Practice Quick Getting Started. By jboss. Updated 13 days ago. KIE Execution Server. Pulls 1M+ Overview Tags.
Kubernetes isn’t about isolation, not in the security sense of the word anyway.
If you reduce containers down to their base essence (and I’m going to take a few liberties here, so bear with me), it’s about processes. Processes. Program binaries executing code in a virtually unique memory address space. Same kernel. Same user/group space. Sometimes, same filesystem and same PID space.
It’s all an elaborate set of carefully constructed smoke and mirrors that lets the Linux kernel provide different views of shared resources to different processes.
This has been most handy when paired with the OCI image standard, and some best practices from the Docker ecosystem – every container gets its own PID namespace; every container brings its own root filesystem with it, etc.
But you don’t have to abide by those rules if you don’t want to.
To wit: kubectl r00t:
This little gem blows up the security charade of containers. Let’s unpack this, piece by piece.
The kubectl run r00t -it --rm --restart=Never bits tell Kubernetes that we want to execute a single Pod (no Deployment here thank you very much), and when that Pod exits, we’re done. Think of it as an analog to docker run -it --rm.
The next bits --image nah and --overrides ... let us modify the generated YAML of the Pod resource. The kubectl run command requires that we specify an image to run and a name for the pod, but we’re just going to override those value with --overrides, so you can put (quite literally) anything you want here.
That brings us to the JSON overrides. For sanity’s sake, let’s reformat that blob of JSON to be a bit more readable, and turn it back into YAML via spruce:
The first thing we do is pop this pod (and all of its containers) into the Kubernetes node’s hostPID namespace. By default, containers get new process ID namespaces inside the kernel – the first process executed becomes “PID 1”, and gets all the benefits that PID 1 normally gets – automatic inheriatnce of child processes, special signal delivery, etc. A side-effect of being in the Kubernetes node’s PID namespace is that /proc/1 refers to the actual init process of the VM / physical host – this will become exceedingly important in just a bit.
Next up, we start modifying the (only) container in the pod. We choose the alpine image, because it is small and likely to be present in the image cache already. We pick an arbitrary name for the container (x), turn on standard input attachment (stdin: true) and teletype terminal emulation (tty: true) so that we can run an interactive shell.
Then, we set the security context of the running container to be privileged – this provides us all of the normal Linux capabilities you’d come to expect from being the root user on a Linux box.
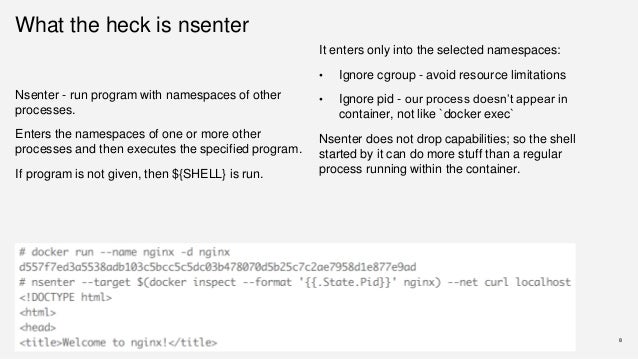
Finally, the coup de grâce: the command we want this container to execute is nsenter, a handy (and flexible!) little utility for munging and modifying our current Linux namespaces; the foundation on which, combined with cgroups, all this containerization stuff is built. We’re already in the host’s process ID namespace, but we are jailed inside of our own filesystem namespace. To get out we can take advantage of the fact that /proc/1 is the real Linux init (systemd) process, so /proc/1/ns/mnt is the outermost mount namespace, i.e. the real root filesystem!
Let’s give it a go:
There you have it. On my EKS cluster, this is the easiest and best way to pop a root shell and go snooping through kubelet configurations, changing things as I need to. Handy for me, but probably not something that would make the cluster operator sleep well at night.
Are you that cluster operator?
This exploit works because of several, collaborating reasons:

- I was able to create a
privileged: truePod - I was able to create a Pod in the
hostPIDnamespace - I was able to run a Pod as the root user (UID/GID of 0/0)
- I was able to run a Pod with
stdinattached, and a controlling terminal.
If you take away any of those capabilities, the above attack vector stops working. Let’s take away as many of those capabilities as we can, using Pod Security Policies.
A Pod Security Policy lets you prohibit or allow certain types of workloads. They work with the Kubernetes role-based access control (RBAC) system to give you flexibility in what you allow and who you allow it to.
In the rest of this post, we’re going to create a namespace and a service account that can deploy to it. We’ll verify that the service account can do bad things first, before we implement a security policy that prohibits such shenanigans.

Here’s the YAML bits for creating our demo namespace and service account:
This gives us a namespace named psp-demo, and a service account in that namespace, named psp-demo-sa. We will be impersonating that service account later, when we attempt to live under the constraints of our security policy.
Next up, we need to set up some basic RBAC access to allow psp-demo-sa to deploy Pods. This is only because we want to demo Pod creation as the service account!
The new (namespace-bound) role psp-sa is bound to the psp-demo-sa service account and allows it to do pretty much anything with Pods. Note: this does preclude us from creating Deployments, StatefulSets, and the like. That’s solely by virtue of the role assignments, and has nothing to do with our Pod Security Policies.
Our first security policy is called privileged, and it encodes the most lax security we can specify. This will be reserved for people we trust with our lives (and our cluster!), and serves to show what happens when a user or service account can’tuse a policy that exists.
The next policy is much more restricted. It’s even namedrestricted! It locks down almost everything we can:

That’s worth reading over a few times to make sure you’ve got it all. The salient bits (insofar as our attack vector is concerned) are thus:
- We disallow
hostPIDPods / containers - We don’t allow directories on the host to be bind-mounted into containers.
(There’s nohostPathlisted in the allowed volume types list) - Pods must specify users to run as, and those UIDs cannot be 0. No root!
With those YAMLs applied to the cluster, we can list our policies:
Right now, these policies are inert. No one is allowed to use them, which means that no one will be able to create any Pods. To activate these policies, we need to grant users and service accounts the use verb against the policy resources. For that, we’ll use a new Cluster Role and a Cluster Role Binding.
First, the Cluster Role:
This role is allowed to list and get all security policies, but only use the restricted policy.
Next, we bind the Cluster Role to all users (via the system:authenticated group) and all service accounts (via the system:serviceaccounts group):
Now, we need to impersonate our demo service account. For that, we can use the --as flag to kubectl:
I hate typing. I hate making other people type. We’re going to alias that big --as flag as ku (which is way easier on the keyboard):
Now, we can explore with kubectl auth can-i:
Note: if you get warnings like Warning: resource 'podsecuritypolicies' is not namespace scoped in group 'policy', don’t worry. I get them too, and from what I’ve been able to tell from random Internet searches, they aren’t anything to worry about.
This tells us that we are able to use the restricted policy, but not the privileged policy; so our attempts at breaking in should no longer bear fruit:
Success!
Host PID is not allowed to be used
Where To From Here?

Armed with your newfound expertise in Pod Security Policies, go forth and secure your Kubernetes clusters! A few things to try from here include:
Docker Nsenter
- Letting actual cluster admins create privileged pods
- Allowing some capabilities to certain specific service accounts
- Auditing all of your service accounts and what they can do under your PSPs
Docker Nsenter Login
Happy Hacking!


